Header
July 3rd, 2012

Brown jade and crystal lamp – Lovely proportions for a side table, entry hall or buffet. The lamp’s base is a rich, brown jade. Blocks of weighty crystal add a contemporary touch to the antiqued brass stem. Approx. height is 29″ to the top of the crystal finial. Double thickness, light coffee shade is 7″ square at bottom. This lamp is new. It was the perfect choice for my client’s mirrored chest, but she only needed one. Unfortunately, this style was only available as a pair, so I have an spare to spare!

On-line, two-way switch – $100. SOLD

(2 Comments)
July 2nd, 2012

Fabulous Pillow Collection – You can practically transform a bedroom or living room with just the addition of these pillows! Heavy woven fabrics in shades of warm ivory, butter yellow, silver sage, pumpkin, mocha and cinnabar would look great on a neutral sofa or bed cover in a room with walls painted any of these colors.

Look at the color palette! Beautiful!

There are a total of 7 pillows: (4) 18” x 18” in the Jacobean floral; (2) 18” x 18” and (1) 22” x 11” in the stria with dots. The inserts are hypo-allergenic down alternative.

The pillows were ordered by a client along with a sofa and loveseat for her living room. Shortly after delivery, she decided to use the seating pieces in her office instead, which meant these gorgeous pillows were not going to work. They are in immaculate, like new condition. And these fabrics are still available if you wanted to reupholster a side chair or ottoman to coordinate!

Collection of 7 custom pillows – $210.00

(0 Comments)
July 1st, 2012

As is common among designers, I have a cache of lovely things I have held onto in hopes of placing them in the perfect spot in a client’s home (or my own). But the collection has grown too large and it’s time to let go! I have furniture and accessories, antique, vintage and new, all in need of someplace more special than my basement to reside. Starting today and continuing for the next few weeks, I will be posting some of these items for sale at crazy cheap prices! If you see something you want, email me (link at left) so we can work out delivery, etc. Please don’t hesitate because each item is one of a kind and will be sold first-come, first-served.

Please share this special sale with your friends. Thanks!

Classic Bench – Graceful piece for a foyer, hallway, under a window or at the foot of a bed. Mahogany finish on carved hardwood frame. Notice the spade foot, serpentine front and rolled arms. Though not an antique, all of these details are Hepplewhite inspired. Fabric is soft gold with chenille dots.

Manufacturer- Chelsea House; custom upholstery

Classic Bench 44.5″ wide x 16″ deep x 31″ high; seat height 19″

Detail of carving

Price: $250.00 (plus shipping, if required)

(0 Comments)
June 28th, 2012

As a child, the thought of eating a beet was thoroughly disgusting to me. First of all, unless it’s a berry, food is not supposed to be that color. Second, since the only beets I had ever tasted were the pickled kind from a jar, I thought they tasted pretty much like dirt with vinegar on it. Over the years, I would wonder if my palate had grown sophisticated enough to appreciate the flavor of a beet. Full of hope, I would taste another pickled one. Nope. Maroon dirt and vinegar. Gross.


Then one beautiful spring day, having lunch with my husband in the open window of a French café in Richmond, I bravely ordered the roasted golden beet salad. I don’t know why, I just did. It sounded so…French. The waiter presented my plate, and there they were – little golden nuggets artfully arranged atop a small handful of arugula, lightly drizzled with Dijon vinaigrette. How could anything so lovely not be delicious? It did not disappoint. The flavor of the tender beets was earthy and slightly sweet. The texture was almost velvety. The contrast with the crisp and slightly bitter arugula was a match made in Heaven…or maybe Paris.


So here is my version. I have added goat cheese because I adore the way it goes with the beets, and toasted pecans for a little crunch. I like pear vinaigrette with this salad, but use your favorite. The key ingredient, of course, are the beets. Any color will work as long as they are fresh. I used golden and pink…their flavors are slightly milder than the more common red beets, although the red ones work perfectly well in this recipe, too.


To prepare the beets:
1. Pre-heat oven to 400 degrees.
2. Twist green tops off of beets, but leave ¼” or so still attached. Do not peel or cut the tops and roots off as this will allow all the juices to run out as the beets cook. Wash beets well.
3. Line a shallow baking pan with a large sheet of foil. Place whole beets on foil and drizzle with a small amount of olive oil, rubbing over the whole surface of the vegetable. Sprinkle with salt. Bring up sides of foil to make a package and wrap tightly.
4. Cook in oven for about 1 to 1 ½ hours, depending on the size of the beets. Check for doneness by inserting a thin knife. It should penetrate the beet easily. Remove from oven when done, allow to cool. (Beets may be prepared to this stage and kept in the refrigerator for up to 2 days.)
5. When beets are cool enough to handle, use a paper towel to easily remove the skins. You may need to use a knife to remove the tops. Slice beets into bite-sized chunks.

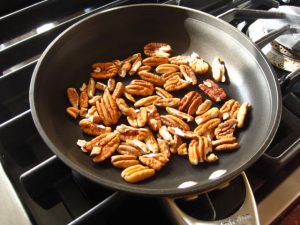
Toast pecans in a dry skillet over medium high heat. Toss frequently and remove from heat as soon as the color starts to change slightly.

Remember my lettuce pot? I gathered arugula and other mixed greens for this salad. Mache would also be good. Just please don’t use regular lettuce. This salad deserves interesting, flavorful greens.

Arrange greens on plate. Top with beets, toasted pecans and crumbled goat cheese. Drizzle lightly with vinaigrette, salt and pepper to taste.

I paired this salad with a slightly oaked chardonnay. The floral notes of the chardonnay work well with the goat cheese while the oak compliments the toasted pecans and earthy goodness of the beets.

Note I said “earthy” not “dirt”.

Enjoy!

(0 Comments)
May 28th, 2012

If you planted some herbs soon after my last post, some of them might be ready for picking by now.

Here are a few tips and ideas for using and preserving herbs:
*Lightly crush a sprig of mint and add to a pitcher of tea or lemonade. Use a fresh leaf for garnish. And don’t forget my recipe for mint juleps a few posts ago!


*Mix chopped dill and minced cucumber into sour cream for an excellent sauce for salmon. Add salt and pepper to taste.

*Chop tarragon, chives or rosemary finely and mix with softened butter. Use to top grilled meats, poultry, fish or vegetables.

*For a warm twist on a caprese salad, top a thick tomato slice with basil leaves and a slice of fresh mozzarella. Bake in the oven until warm and cheese just begins to melt.

*Stuff the cavity of an oven-stuffer roaster with a lemon cut in half, a few whole garlic cloves and a bunch of oregano. Roast low and slow for tender Greek-style chicken.

*Slice an English cucumber into a colander set over a bowl. Salt the slices and allow water to drain for several hours. Discard water. Mix cucumber with finely minced fresh rosemary, seedless red or black grapes (cut in half) and a big splash of white balsamic vinegar. Delicious, light and healthy!


*Chive blossoms are edible and look beautiful atop a creamy tomato or potato soup.

*Add chopped tarragon to chicken or tuna salad.

*Chopped mint added to meatballs is wonderful!

*When cooking with fresh thyme, (an absolute must in most soups and stews) there is no need to tediously remove the tiny leaves from the stem. Just toss in the whole sprig. The leaves will fall off during cooking. Remember to remove the bare stem before serving.

*To make basil chiffonade, stack leaves, roll together, and slice across the roll thinly. This preparation method is called for frequently in recipes.

Herbs to dry – oregano, sage, tarragon, thyme, mint, rosemary. Most herbs with woody stems are best preserved by drying. A couple of hours before harvesting, give herbs a good shower with the garden hose. Allow the sun to dry them completely. Then cut stems and gather into small bunches. Wrap stems tightly with rubber bands. The rubber bands will stay tight as the stems dry and shrink.

Hang bunches upside down in a cool place with good air circulation. Door and cabinet knobs or a rod in an unused shower are all good places. Most herbs will be dry in 2 – 3 days. To remove leaves, place a large piece of butcher paper or paper towels on the kitchen counter and crush leaves gently over the paper. Remove pieces of stems. Now fold the paper to make it easy to pour the leaves into small jars or plastic bags. Be sure to label the containers because once dry, herbs are harder to identify. Dried herbs are more concentrated in flavor, so use less than you would if you were using fresh.
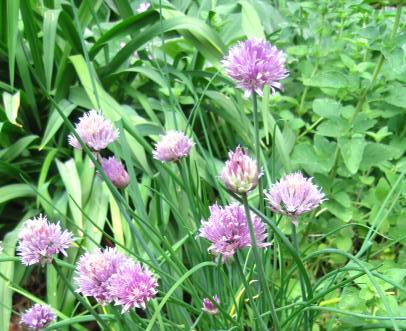

Herbs to freeze – chives, basil, dill, cilantro, parsley. Most tender, non-woody herbs are best preserved by freezing. Make sure herbs are dry after their shower (see above). Then, just pop them into freezer bags and place in the freezer. Once frozen, you can easily “mince” these herbs by gently crushing the bag.

You can also make batches of pesto with any over abundance of herbs. Freeze the pesto in ice cube trays. Wrap the filled trays with plastic wrap. One cube is about one serving. Frozen pesto lasts at least one year. (More on making pesto and recipes for using it later in the summer.)

Once you start using herbs to flavor your foods, you may find that you need less salt. In addition, herbs, being leafy green plants, also provide a multitude of nutritional benefits. You will quickly learn which herb is best for a particular use and how much to use for your taste, but don’t be afraid to experiment! You may find some unexpected delicious combination. Enjoy!

(2 Comments)